Pages

Thursday, July 25, 2013

Bread Made Easy

There is something about a freshly-baked, warm loaf of bread that reminds me of my childhood. Sometime in the '90s my dad received a bread machine for Christmas. Him or my grandmother used to make a fresh loaf of bread overnight or while we were away at school. On those days our house smelled amazing. I think my parents still have that bread machine somewhere, gathering dust. I enjoy baking for my family. I don't own a fancy mixer or a bread machine, but I can still make delicious bread from scratch. 
This week I adapted a recipe from one of my favorite recipe books to create a bread dough that can be made in bulk and stored in the refrigerator for up to a week.

Refrigerator Bread Dough
Makes about 3 pounds of dough

Ingredients:
2 Tbsp. active dry yeast
1/3 cup sugar 
2 cups warm water
2 tsp. kosher salt
1 egg, beaten
4 Tbsp. melted butter
2 cups whole wheat flour
3-4 cups white bread flour

Directions: Mix the yeast, sugar, and warm water together and let dissolve. Add the salt, beaten egg, and melted butter. Mix in the whole wheat flour and enough of the bread flour until it becomes hard to stir. Turn the dough out and knead until the dough is smooth and elastic. Wash the bowl out and grease it and place the dough in the bowl, rolling it around. Cover with plastic wrap and let rise for about an hour. Punch down the dough and recover with plastic wrap and a plate. Place in the refrigerator and pinch off the dough as you need it.


Day 1, Butter-top dinner rolls: I pinched off 8 2-ounce balls (I weighed them using my kitchen scale) and shaped them into dinner rolls and placed them into a buttered 8x8" Pyrex dish. I covered them with a clean towel and let double in size. I brushed the tops with some more melted butter and baked them at 425 for about 15 minutes.


Day 2, Sandwich bread: Now this isn't your average sandwich bread! I took an 8 ounce piece of refrigerated dough and rolled it out into an 18" log, folded it in half and gave it a twist. I dusted the top with a bit of flour and let double in size. I baked it at 425 for 15 minutes.


Day 2, Hamburger buns: I weighed out four 2 1/2 ounce balls of dough and rolled them into balls. I placed them on a parchment lined baking sheet about 2 inches apart, covered and let rise until double in size. I put brushed a bit of egg wash on the top and sprinkled them with a combination of poppy and sesame seeds. Well, at least I sprinkled 3 of the 4 with seeds and left the last one naked for my step-daughter. I then baked them at 425 for about 15 minutes.


Day 3, Garlic knots: I weighed out the remaining dough into 1 1/2 ounce portions and rolled each piece into a log about 10 inches log. I then formed them into knots. I let them rise while I made a garlic infused butter. Basically I took half a stick of butter, 6 smashed garlic cloves, and a pinch of kosher salt and let sit over low heat for about 30 minutes. When the knots were doubled in size, I brushed them heavily with the garlic butter and sprinkled a bit of garlic powder and kosher salt onto each one, and (again) baked at 425 for 15 minutes.


As the dough sits in the fridge it develops a yeasty aroma, almost like a sourdough. Since I was making rolls for 5 everyday, the amount of dough this recipe makes didn't last a whole week. Next time I will experiment with doubling the recipe, or maybe switching it up a little. Stay tuned!

Tuesday, July 23, 2013

Beefy Zucchini Boats

Today I'm continuing to use vegetables from my garden to make dinner. My zucchini plant has become enormous! It has produced an almost-continuous supply of zucchini, so I've had to come up with some creative ways for my family to eat it. Most things are better when stuffed with meat and cheese, so that is where my Beefy Zucchini Boats came about. I made enough filling for 4 medium zucchinis (or 8 boats), although 1 boat per person was filling enough.

Beefy Zucchini Boats
Serves 8, or 4 very hungry adults


Ingredients:
1 medium onion, diced
1 red bell pepper, diced
1 green bell pepper, diced
3 cloves garlic, minced
1 1/2-2 lb ground beef
1 tsp. ground cumin
1/2 tsp. smoked paprika
Salt and pepper
4 medium zucchini, divided lengthwise
Shredded cheese (smoked mozzarella, monterey jack, or any other easily melting cheese that you prefer)

Directions: Turn on your oven to 425 and line a baking sheet with a greased piece of aluminum foil. Sauté the onion and peppers until softened. Add the garlic and cook a few more minutes. Add the ground beef, breaking it up in the pan as you go. I had about 3/4 of a pound of 90:10 ground sirloin and about a pound of 80:20 chuck in my refrigerator, so that is what I used. Season the beef mixture with salt, pepper, cumin and smoked paprika and cook until deeply browned, stirring occasionally and scraping the bottom of the pan. While the beef is cooking, divide your zucchinis lengthwise and scoop out the seeds and some of the flesh to make a trough for the filling. Generously fill the hollowed zucchini with the beef mixture. Shred up a bit of cheese to put on top. I had smoked mozzarella available, but any easily-melting flavorful cheese would work. Bake for 10 minutes, or until the cheese has started to brown on top.

Monday, July 22, 2013

Sunday Dinners, Marinara Sauce

My little vegetable patch has been giving me some beautiful tomatoes this summer. I have 2 Black Krim heirloom variety plants and a Roma tomato plant along one edge of a 4x8' raised planter. They have been wonderful in salads and on burgers and sandwiches, but I was left with a growing pile of uneaten tomatoes on my countertop, so tonight I made a big batch of marinara sauce to use them up. Homemade tomato sauce is so rewarding, and with the right tools, not even that much work. Start with sautéing your base vegetables and some garlic, add chopped tomatoes and a splash of white wine, season, simmer, and process and finish. That's basically all there is. You can make a lot or a little based on the amount of tomato you have available, and it keeps wonderfully in the freezer to have homemade tomato sauce when flavorful summer tomatoes are long gone.

Marinara Sauce
Makes about 2 quarts
 Ingredients:
1/4 cup extra virgin olive oil
2 medium onions
3 ribs celery
1-2 carrots
Garlic, 4-8 cloves, minced
Tomatoes- I used around 16 Roma and 10 Heirlooms
1 cup leftover white wine
1 Tbsp. dried oregano
Salt and Pepper
Optional: fresh basil, red chili flakes

Directions: Heat a large pot over medium-low heat, add olive oil. Dice the onion, celery, and carrots and add to the pot to sweat. I use a mirepoix ratio with these vegetables, with 2 parts onion to 1 part celery and carrot. After the onion is translucent and just starting to caramelize, I add the minced garlic. Depending on how much garlic you like depends on how much you add. We really like garlic in our tomato sauce, so I probably added about 1/2 a head. Next add the wine to deglaze the pan and add all the tomatoes, roughly chopped.
My little one loves tomatoes, and was underfoot during this process, so it took a little longer than usual.
Since I own a food mill, I don't bother blanching/shocking/peeling my tomatoes and just add them to the pot diced up. The food mill separates the skin after the sauce is made, eliminating a couple steps and a few hours of prep work. If you don't own a food mill, removing the skin before adding to the sauce is necessary, since it won't break down while cooking and can negatively affect the texture of your sauce. I season the sauce with a little dried oregano, salt, and pepper, and let it cook down for about an hour, or until its reduced by about a third.

Pass it through the largest hole setting of your food mill and taste for seasoning, adjusting if necessary. If you don't own a food mill you can pulse though a food processor or a blender in batches, but the texture will be a bit smoother. If you find that your sauce is a little too watery after you pass it through the food mill, feel free to return it to the stovetop to let reduce a bit more.

Tonight we used our fresh marinara sauce over some store-bought cheese tortellini. I ladled about 2 cups of sauce into a large pan and added some fresh basil and let it reduce a bit more while the tortellini were cooking to al dente. I then tossed the tortellini into the sauce with a ladle of the starchy pasta water and grated some fresh parmesan on top. We topped our pasta with a little extra sauce and cheese and ate it with a crusty loaf of garlic bread.

I put the extra tomato sauce in pint containers since I plan to share, but you could also freeze it flat in gallon bags to have your own tomato sauce year-round or for middle-of-the-week suppers.

Wednesday, July 17, 2013

Grilled Corn and Nectarine Salad

Visiting my local farmer's market has become a fundamental part of my food shopping this summer. There is just something so fresh and Californian about buying your produce and eggs at an open-air market, where all the vendors are hawking samples of their sweetest berries and stone fruits. Not only is the fruit selection superior to the supermarket selection in freshness and flavor, but also in price. As you shop around the farmer's market, you can often find organic produce selling for the same price as conventional produce found in the grocery store. I go to the farmer's market without a set shopping list, and I formulate menu ideas based on what I find.
This is exactly how this salad came about. I ventured to the farmer's market to take in a walk and get in some shopping at the same time. I picked up some organic brown eggs (2 dozen for $5), corn (4 for $3), organic white and yellow nectarines ($2.50/lb), and a loaf of artisanal bread ($5). For $20 I got some wonderful goodies and the makings of a great side salad to pair with the marinated tri-tip (which I picked up for $3.99/lb) that I planned for dinner that night. Since I was already planning to grill the tri-tip, I simply blistered the corn on all sides before cutting it off the the cob. Choose nectarines that are ripe but still a bit firm so they hold up to the texture of the corn. By adding just a little bit of arugula and romaine which I had in my crisper drawer begging to be used up, it transformed from a salsa into a salad. Adding a bit of queso fresco and dressing it simply with olive oil and red wine vinegar was the perfect finishing touches that kept the salad simple, but delicious.

Grilled Corn and Nectarine Salad
Serves 6


Ingredients:
4 ears of corn
2 large yellow nectarines
10-12 basil leaves, torn
1/3 cup crumbled queso fresco
Extra virgin olive oil
Red wine vinegar
Salt and pepper
1 cup baby arugula
2 cup torn romaine leaves
Optional: minced red onion, bacon crumbles

Directions: Husk your corn and place on a hot grill, turning every few minutes until the sides are evenly carmamelized. Take it off the grill and let cool. To remove the kernels from the cob I invert a smaller bowl into my mixing bowl and stand the corn up while cutting down the sides. I find that if I cut corn on a cutting board, the kernels fly everywhere. 
Dice your nectarines and add them and the queso fresco into the bowl. Dress with a bit of red wine vinegar and a glut of extra virgin olive oil and salt and pepper. I can't really give you the measurements of the dressing, but the ratio I use is about 1 part vinegar to 2 parts olive oil. Tear your basil and romaine, and add your arugula. Toss the salad so the greens are evenly dressed, and that's it. Originally I had planned to add bacon and red onion to the salad, but got sidetracked, so they never came out to play. Another day...

This salad was so light and refreshing, I kept going back for more. I could have easily skipped the meat and just had this salad and a little warm bread for dinner. If I was only feeding myself I probably would have. The combination of fresh-picked corn, nectarines, and basil just felt like summer, and was a great way to enjoy local, seasonal produce.


What are some of your favorite summer ingredients to put into a salad? 

Monday, July 15, 2013

An autumn meal on a summer night

Earlier this week I ventured to my local Asian supermarket. My step-son discovered how yummy dried mango is, so I picked up a few bags, plus some other goodies for the kids like fruit coconut jellies, Pocky, and Hello Panda cookies. I also cruised the produce aisles to make me feel better about buying junk food, where we picked up kiwis both green and golden, fresh lychees, peppers, onions, snow peas, and butternut squash.

Tonight I had a meal in mind has become a family favorite, pork chops with roasted vegetables and potatoes.

Funny how buying one thing like a butternut squash can set the menu in motion. I paired butternut squash with apples and petite potatoes and some fresh herbs for a truly delicious side dish to pair with my flavorful fried pork chops. I jazz thin cut pork chops up with some Dijon mustard and then bread them with panko and pan fry them until they are golden brown and delicious.

Roasted Butternut Squash and Potato Medley
Serves 4

Ingredients:
3/4 lb. petite new potatoes
butternut squash
1 large granny smith apple
6-8 sage leaves
3-4 sprigs thyme
olive oil
apple cider vinegar
garlic powder
salt and pepper

Directions: Preheat your oven to 450 degrees. Cut your butternut squash in half width-wise so you have the top half and the half with the seeds. For this recipe I only used the top half and put the other half in the fridge for another meal. Peel and cube your squash into pieces about the same size as the potatoes. I picked up these tiny new potatoes from Whole Foods and they are perfectly bite-sized, but if you had larger new potatoes you could always quarter them.

Peel your apple if you wish, then dice the same size as the squash. I added some sage and thyme that I had growing in my kitchen window, then tossed the whole thing with a good glug of olive oil, a splash of apple cider vinegar, garlic powder, salt and pepper and spread it out evenly on a baking sheet lined with aluminum foil for easy clean-up. In hind sight, I would spray the foil with a bit of non-stick spray, as I did have some sticking issues with everything caramelizing. Roast for 20-30 minutes until potatoes and squash are fork-tender.


Dijon Mustard Fried Pork Chops
 
Ingredients:
Thin cut pork loin chops
2 Tbsp. coarse ground Dijon mustard
1/2 c all-purpose flour
1 tsp. ground mustard
2 eggs
Panko breadcrumbs
Salt and pepper
Vegetable oil for frying
 
Directions: Add about 1/4" vegetable oil to a cast-iron or other heavy bottomed pan and heat on about medium. Season pork with salt and pepper. Spread a thin coat of Dijon on each side.
Set up your breading station. Add about 1 tsp. of salt, pepper, and ground mustard to about a 1/2 cup of flour into a dish. Beat the two eggs in another dish, and put your panko breadcrumbs in a third.
 
Coat each chop in flour, then egg, and panko, making sure to shake off the excess between each step. Fry on each side about 3-4 minutes until golden and crispy.


Drain on a paper towel and season with a sprinkle of salt while still hot.


Monday, July 8, 2013

Meatless Monday, well it was supposed to be...

Sometimes dinner plans don't turn out exactly the way you want them to. Before my step-kids arrived for the summer I was able to cook whatever I wanted to with minimal complaints. My husband and my toddler would eat what I put on the table. Now I have two food critics in my household. I could try and force them to eat what I want them to eat, but in the end it would turn into a power struggle and then it's two against me. I would rather not have the whining and rude comments at the dinner table. We've come a long way, but they're still not to the point where they can just taste it and the set it off to the side if they don't like it. I still hear plenty of opinions on vegetables that "smell gross" or "look disgusting" at the dinner table.
When I brought out the eggplant and the zucchini in hopes of making a vegetarian lasagna, I heard groans and moans almost immediately. So to try and salvage hopes of a polite dinner together as a family, I compromised a little. It was still going to be a mostly vegetable lasagna with a layer of browned sausage. I got what I wanted, while they got what they wanted.

Vegetable Lasagna
Serves 8-12

Ingredients:
Tomato or marinara sauce- 24 oz jar
Lasagna noodles, about 12 for a 9x13 pan
2 eggplants
2 large zucchinis or 3-4 small
1 pound Italian sausage (optional)
8 oz Asiago cheese, grated
Ricotta cheese- 15 oz container
Cottage cheese- 16 oz container
Salt, pepper, dried herbs to taste
Grated mozzarella cheese for topping

Directions:
  • Start a large pot of water on high to boil for the lasagna noodles. Salt the water and cook noodles 8-10 minutes. Since you will be baking the pasta, you want the noodles to be less than al dente. Drain and rinse with cool water to stop the cooking an prevent clumping.
  • Slice the eggplant lengthwise about 1/2" and the zucchini lengthwise about 1/4". Salt both sides and lay on paper towels and wait about 10 minutes to draw out excess moisture. Press with paper towels and sauté in batches to golden brown and softened.
  • Brown your sausage, if using. I add about 1/2 cup of marinara to the pan afterwards to pick up all the browned bits off the pan.
  • Make your cheese mixture. I combine the ricotta, cottage cheese, and half the grated Asiago (or you could use any other hard Italian cheese, like Parmesan), and then add salt, pepper, and dried herbs to taste. Tonight I had dried oregano on hand so that's what I used, but dried basil, Italian seasoning, or fines herbes would also work. You can also add minced garlic or garlic powder to the cheese mix if you like.
Once all the components are prepared you a ready to build your lasagna. Spray a 9x13 pan with non-stick spray and add a thin layer of tomato sauce. Add a layer of noodles, slightly overlapping. Add the eggplant in one layer, then top with half your cheese mix. Add another layer of noodles, and top with tomato sauce. If you are using sausage, add it now. Then comes your layer of zucchini and the rest of your ricotta mix. Add your final layer of noodles and top with sauce and the rest of the Asiago and a few handfuls of grated mozzarella. Bake at 350 for about an hour, and let cool slightly before cutting and serving. I typically only wait 10 minutes because we're hungry at that point, but 20 minutes would be even better.

In the end, you get a hearty lasagna that you can claim to be good for you because it is full of vegetables, and your kids still get a cheesy, comforting dish that they can enjoy. They still avoided the eggplant, though...

Sunday Dinners, Roast Chicken

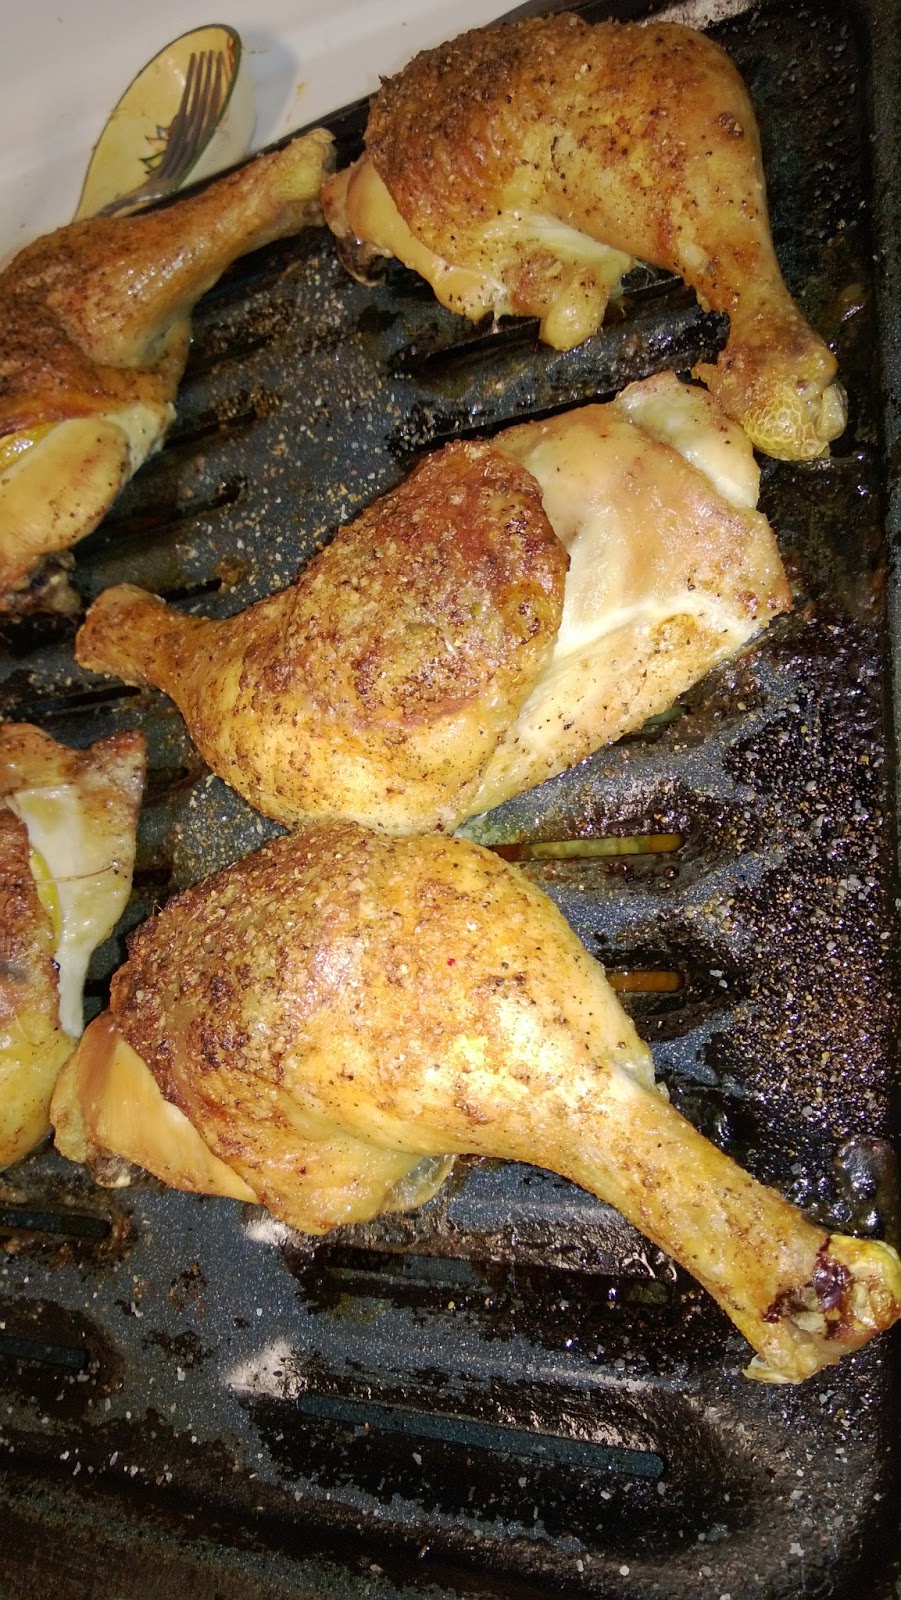
Cooking for my family gives me satisfaction. I know they are eating a healthy meal and we get to sit down together as a family before the hectic work week begins again. Tonight was no exception. I made roast chicken and mashed potatoes for dinner. Now, getting my husband to eat chicken is quite a task as he claims to have an aversion to chicken, yet he eats it every time. Here's my secret:

  • Start with dark meat. Dark meat tends to be more flavorful than light meat, so I typically use leg quarters instead of breast meat.
  • Buy bone-in, skin on chicken pieces. Boneless is great for quick cooking stir-fry, but for roast chicken you want the bone to keep your chicken juicy and the skin to get crispy.
  • Season inside and out. I always put salt and aromatics under the skin of the chicken to lock in flavor. Tonight I tucked a slice of lemon and some fresh oregano under the skin.
  • Don't forget to season the skin as well. Tonight I used salt, fresh cracked pepper, and garlic powder.
  • Fat is flavor. I brushed on melted butter before roasting, but feel free to use a healthier fat like olive oil.
  • Raise your chicken up. I used a broiler pan, but a tray with a roasting rack or even setting your chicken on cut vegetables would work. The idea is to get air circulation to the underside of the chicken so it doesn't get soggy.
  • Start your oven hot. I put my chicken in a 450 degree oven for about 15 minutes before dropping the temperature to 400 to roast the rest of the way, until the internal temperature reaches 165. I got sidetracked a bit so my chicken might have cooked a bit longer than it should have, but it was dark meat so it was still juicy and delicious.


Now doesn't that look yummy? The skin was golden brown. and extra crispy. Now I could have made a pan jus from the drippings, but between the toddler teething and the teenagers being teenagers, I didn't, but I did serve these yummy pieces of chicken with some extra creamy mashed potatoes.
 
That's a hearty meal right there! I should have added a vegetable to round out the meal, but for now, just use your imagination. I only had zucchini from my garden and mushrooms in the fridge, and those aren't exactly the kid's favorite, so I omitted the vegetable to avoid an unnecessary argument. But don't worry, tomorrow is Meatless Monday and I think eggplant parmesan is on the menu.